FIRST PHASE OF THE PATINA (SURFACE DISTRESSING) The video explains the importance of the 1st phase of the patina which concerns gold surface distressing and shows the tools to realize it.
MICRO BREAKS The tools we use to create the patina of an antique-style frame are rudimentary. They are in fact some stones, easily found along the banks of the rivers, sufficiently solid and smooth. We use them to create micro-cracks on the golden surface. See the technique: https://youtu.be/TSXLayRYu7g
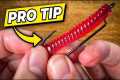
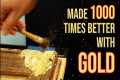
RUBBING OUT THE GOLD A material of considerable importance in this step of the work is fine wool. We use it to consume gold. The aim is to recreate the wear of ancient golden surfaces, those in which the red bole shines through the leaves of gold. See the technique: https://youtu.be/DsK7sVkC-BM
FAKE WORMHOLES To complete the first phase of the patina, we create false wormholes with a long nail. https://youtu.be/leqjJA5-jPE
SECOND PHASE OF THE PATINA (DARK SHELLAC) See the phase of the aging process concerning the gold darkening: https://youtu.be/E_vnOIyGkVo